Domo offers a wide range of pre-built connectors, but occasionally, an option might not exist for the data source you’re working with. When that happens, you have options—one of the most efficient being the Domo JSON No Code Connector.
This tool makes it easy to connect APIs and import data into Domo without writing any code. It’s a fast and accessible way to bring your data into the platform.
In this blog post, we’ll cover everything you need to get started with the Domo JSON No Code Connector including when to use it and a real-world example of how to set it up (featuring cat breed data!).
When to Use the Domo JSON No Code Connector
The Domo JSON No Code Connector is a quick and easy way to bring external data into Domo without coding. Setup typically takes around 10 minutes, making it a great option for users who want fast results with minimal configuration.
If your data is accessible via a public or private API and doesn’t require complex changes to how data is retrieved or structured, this connector is likely all you need.
We recommend using the Domo JSON No Code Connector when:
- You want to get data into Domo quickly.
- Your data doesn’t need heavy manipulation on the way in.
- You’re working with a single, accessible API.
If your use case involves more complex logic (like pulling from multiple APIs simultaneously), building a custom connector may be a better option. Check out some custom connectors that we’ve built to explore what’s possible.
How to Use the Domo JSON No Code Connector
To show you how simple it is to use the JSON No Code Connector, we’ll walk through a fun example: pulling data about cat breeds from an open API. Specifically, we’ll be using the Cat Fact Ninja Breeds API, which return a list of cat breeds along with details like country, origin, coat, and pattern.
This example keeps things straightforward—no authentication or complex setup required—making it perfect for learning the basics of configuring your own API connection in Domo.
1. Find the connector in the Domo Appstore
In the Domo Appstore, you’ll see two versions of the JSON No Code Connector:
Both versions work almost the same way. The only difference is that the OAuth version is designed for APIs that use an OAuth authentication flow. For this example, we’ll be using the standard JSON No Code Connector. Select “Get The Data” to begin using the connector.
2. Set Up Credentials
Within the Credentials pane, you’ll be prompted to select an authentication type. For this example, choose “None” since the Cat Fact Ninja Breeds API does not require authentication to access its endpoints.

Click “Connect”. Once it is connected, click “Next”.
3. Configure Data Selection
Select the Request Type, Method, and Endpoint
In the Data Selection pane, configure the API call settings:
- Set “Type” to “HTTP Request”.
- Set “Method” to “GET”.
- Enter the following as the “Endpoint”: https://catfact.ninja/breeds
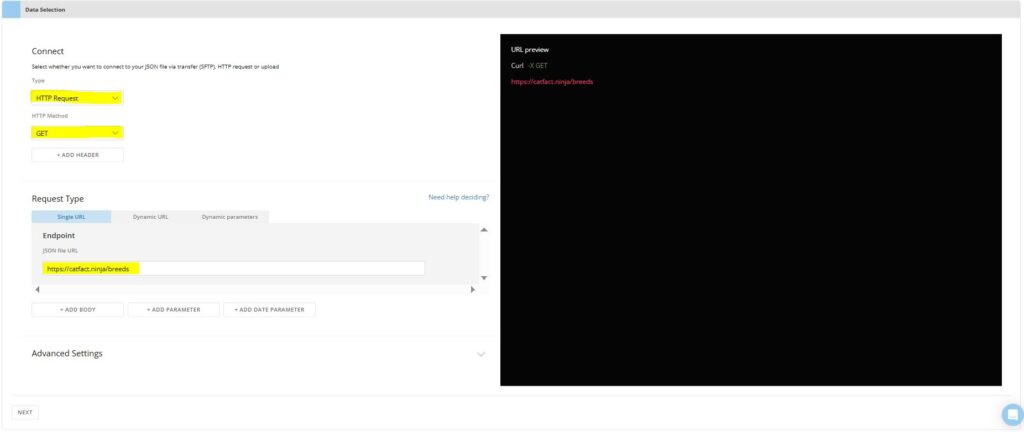
These settings tell the connector to perform a simple HTTP GET request to retrieve cat breed data from the API.
Set Up Dynamic Parameters
Next, navigate to the “Dynamic parameters” tab. Because the Cat Fact Ninja Breeds API returns data across multiple pages, you’ll need to configure a “Page” parameter with multiple values. This allows the connector to request data from several pages automatically.
Here’s how to set it up:
- Under “Values location”, select “Enter the values to loop through”.
- In the “Loop through each of these values (comma separated)” box, enter: 1, 2, 3, 4 (separated by commas).
- For “Parameter Key”, enter “page”.
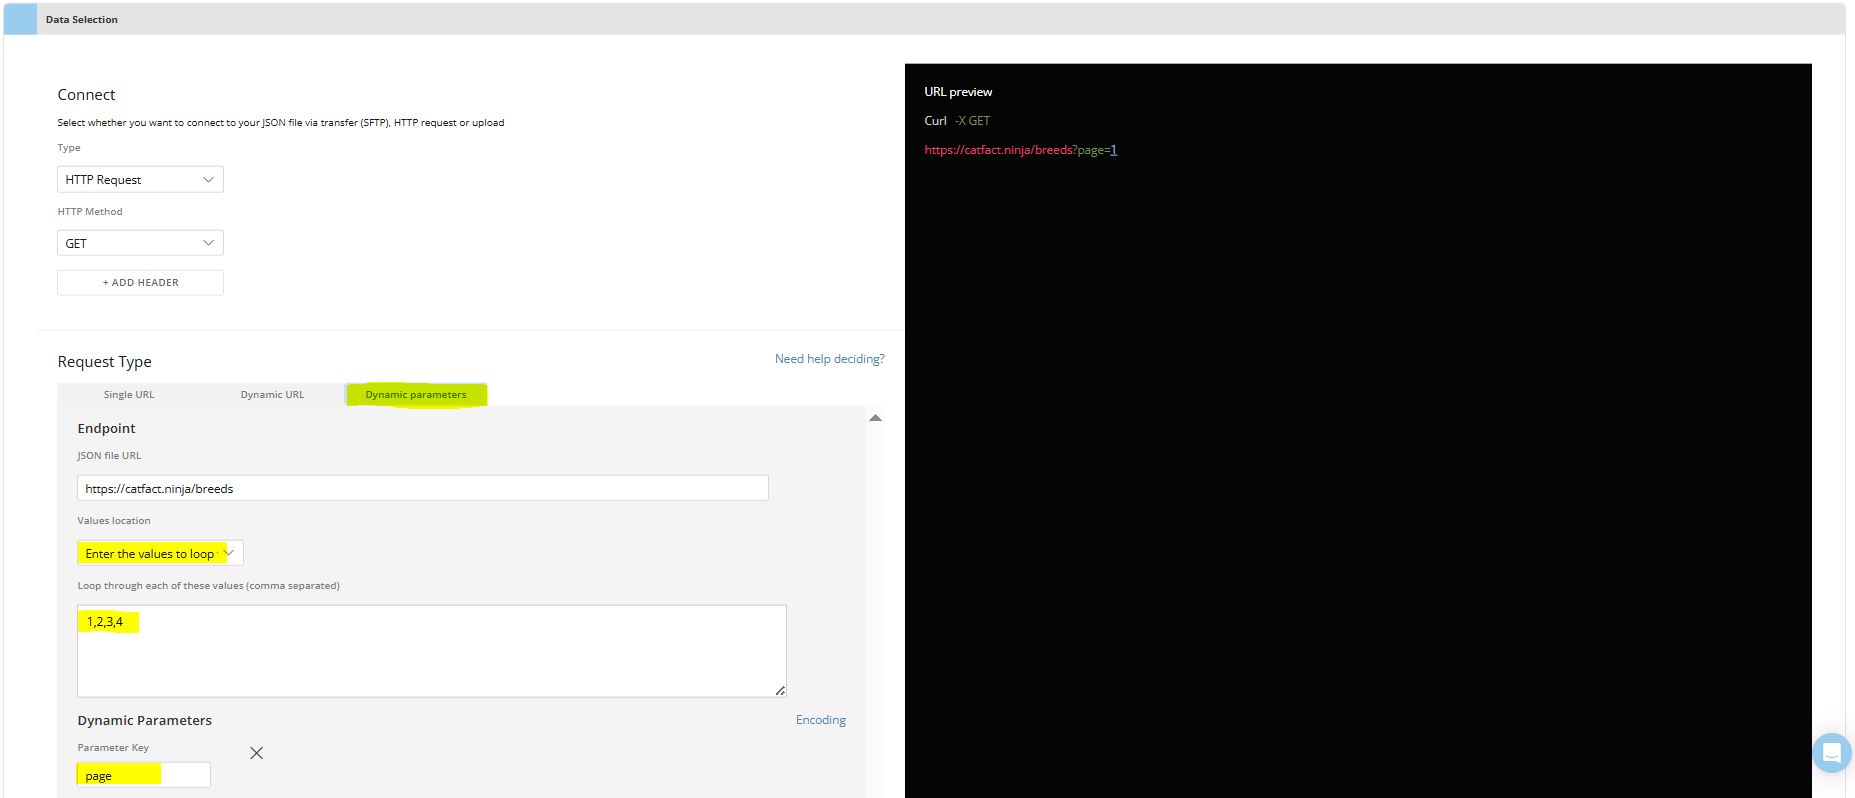
This tells the connector to make separate API calls for pages 1 through 4.
Add a Static Parameter
To control how many results are returned on each page, add a static parameter:
- Scroll down slightly and click “+ Add Parameter”.
- In the “key” field, enter “limit”.
- In the “value” field, enter “25”.
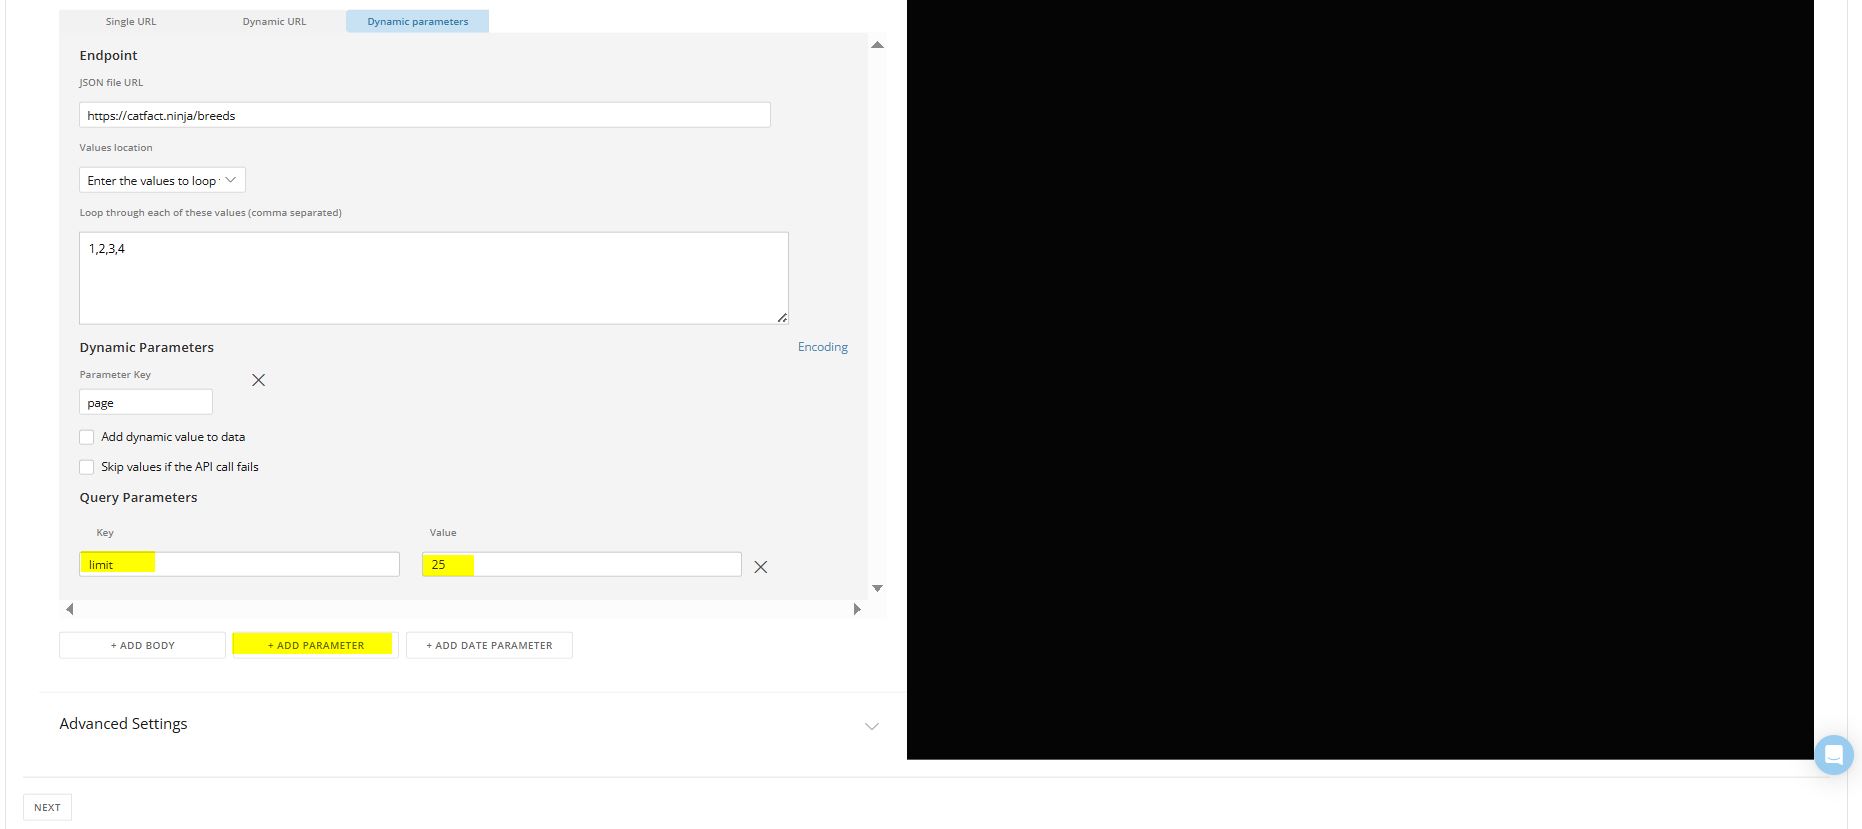
This tells Cat Fact Ninja Breeds API to return 25 results per page, which is the maximum number allowed by the API.
Preview the Final API Call
On the right side of the screen, you’ll see the URL Preview update based on your settings. It should look like this: https://catfact.ninja/breeds?page=1&limit=25

This confirms that your API request is correctly configured and ready for the next steps. Click “Next” at the bottom of the Data Selection pane.
4. Set Up Parsing
In the Parsing pane, set “Pagination” to “No Paging”. Next, click the down arrow to the right of Parsing to expand the parsing options.

Expand Array as Rows
From the sample data that loads, click the column “data” and then select “Expand Array as Rows” from the available options.
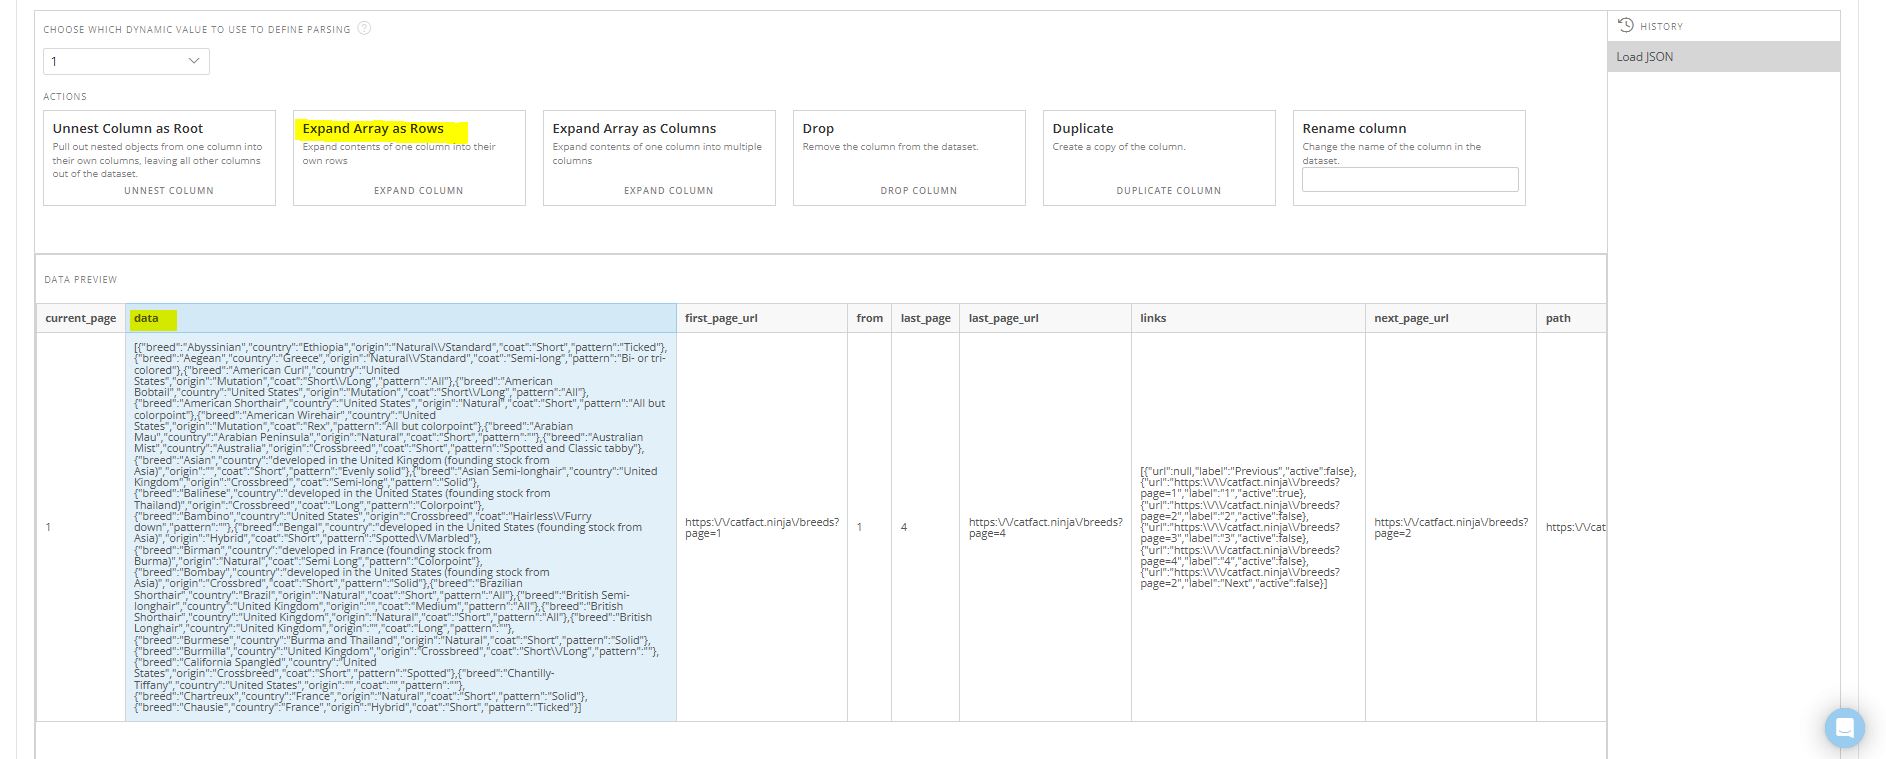
This will flatten the array, turning each cat breed into its own row in the dataset.
Drop Unnecessary Columns
To further clean up the data, you can drop unnecessary columns—such as current_page, first_page_url, from, last_page, last_page_url, links, next_page_url, path, per_page, prev_page_url, to, and total—that aren’t needed for the cat breed details.
To do this, click on a column you want to remove, then select “Drop” from the available options.
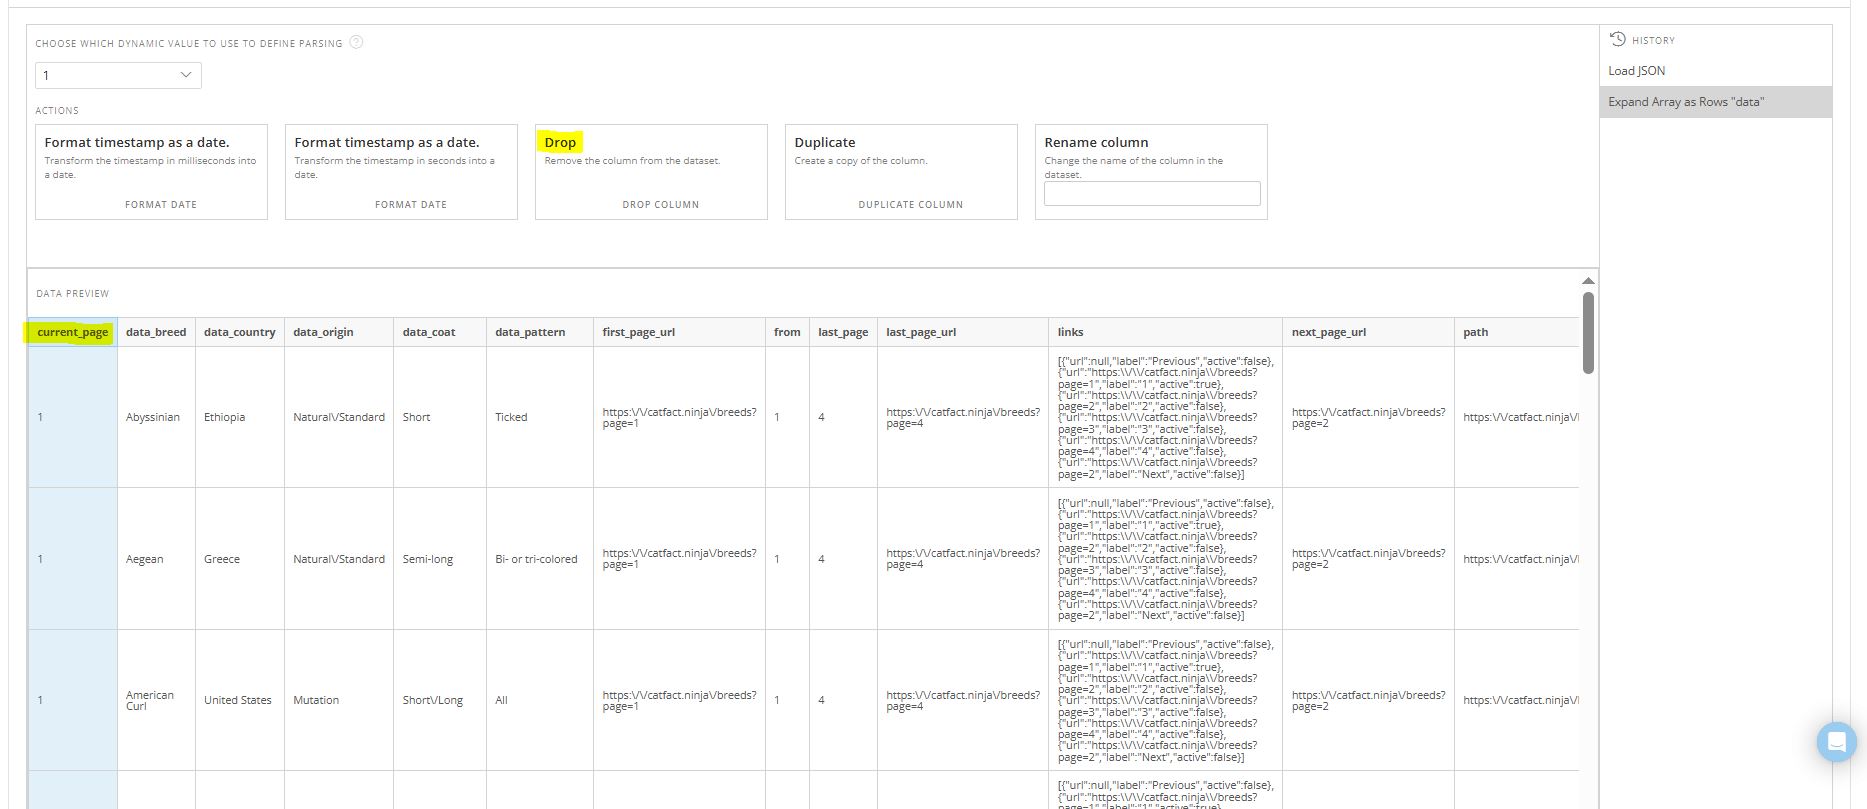
Repeat this process until all unnecessary columns have been removed.
Rename Columns
You can also rename the remaining columns to make them cleaner and easier to work with. For example, you can remove the “data_” prefix from column names. To do this, click on a column—such as “data_breed”—and type the new name (e.g., “Breed”) into the Rename Column option. Hit enter.
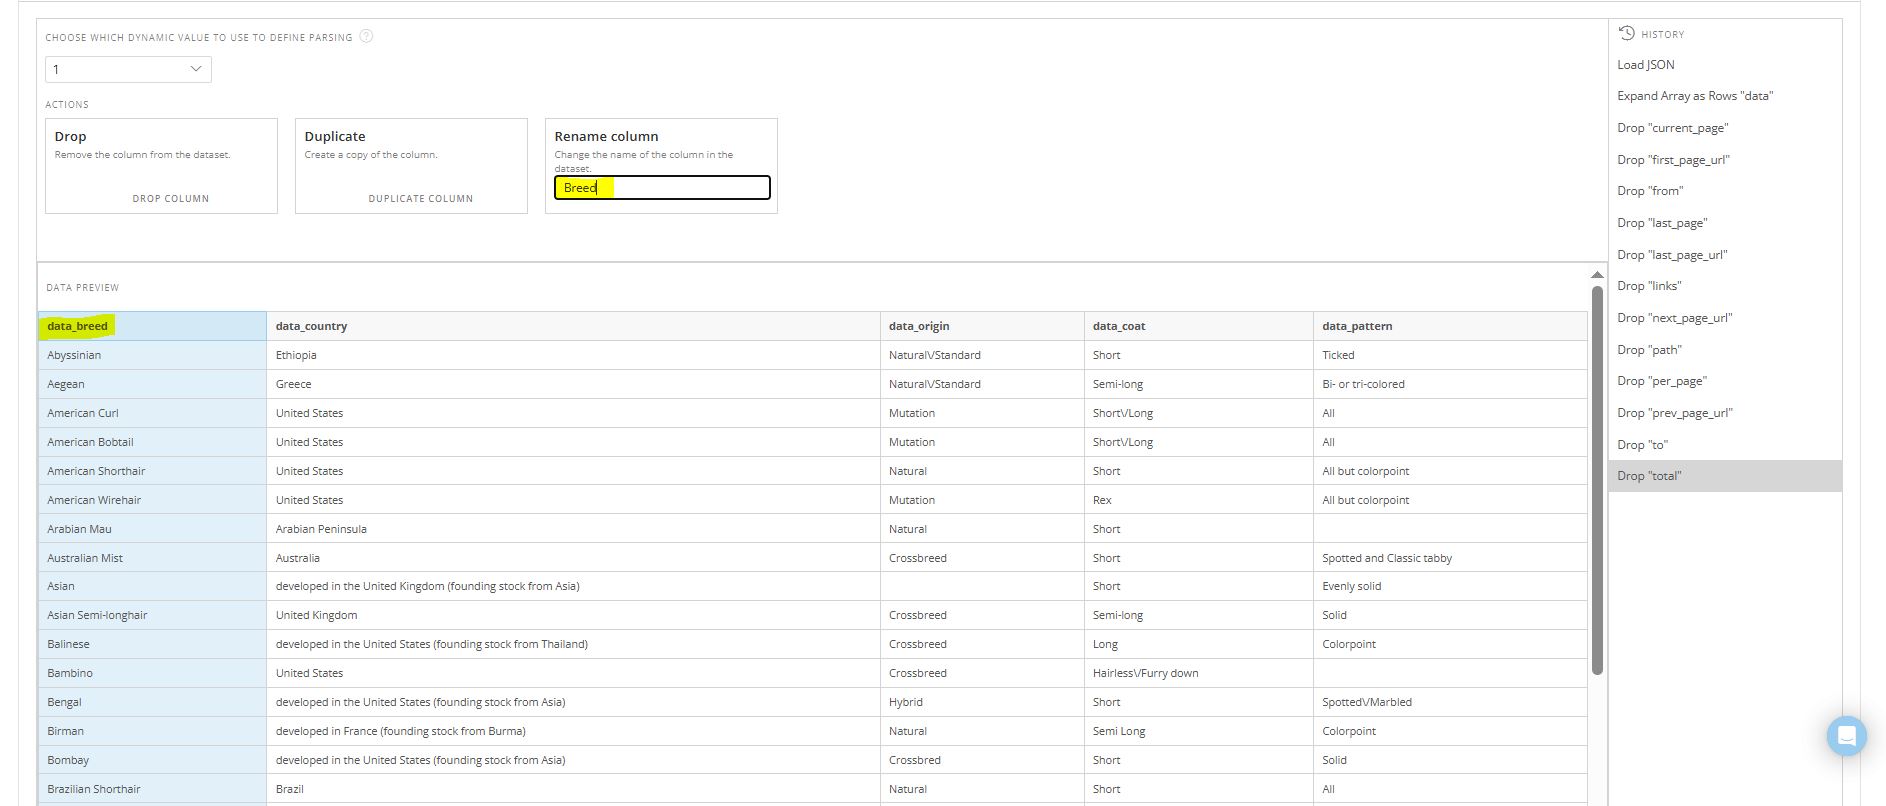
Repeat this process until all columns have been renamed appropriately.
Click “Next” at the bottom of the Parsing pane.
5. Define the Schema
In the Schema pane, select “Use automatic schema detection (recommended)” if it isn’t already selected. Then, click “Next” to continue.

6. Run the Connector
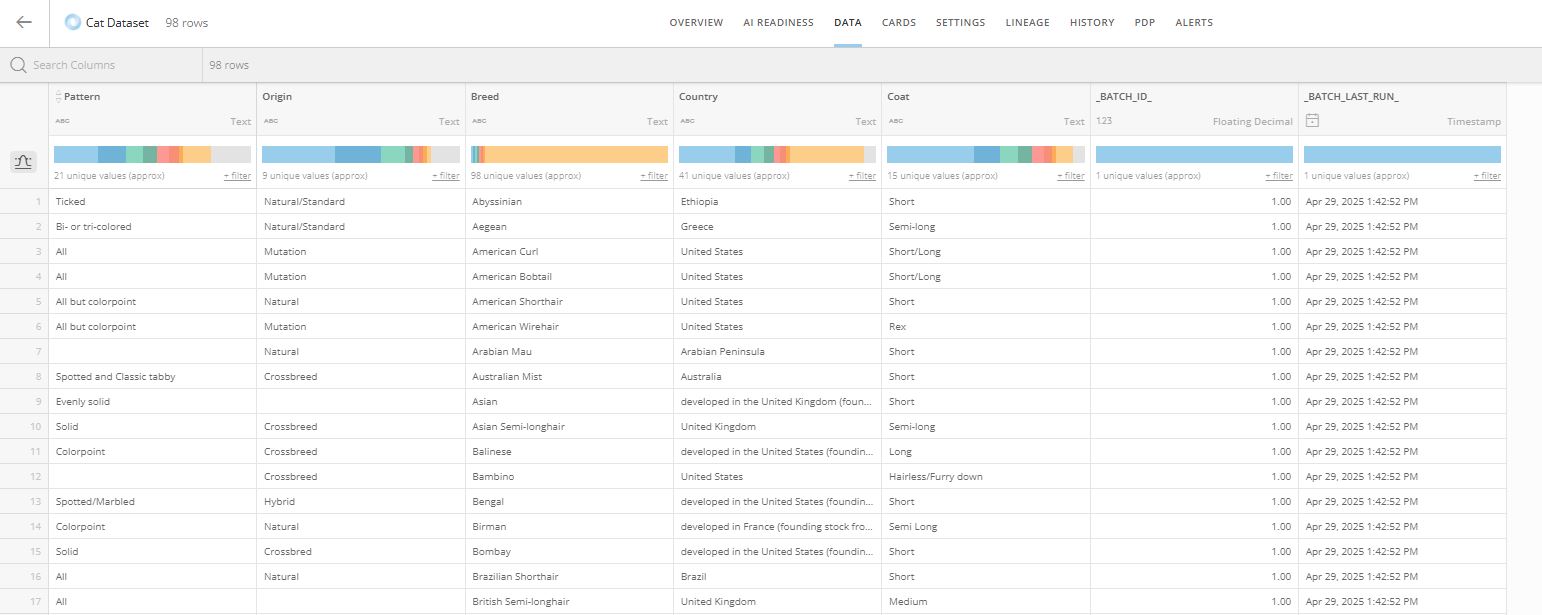
Set a schedule for how often you want the connector to run and refresh your data. Give your connection a clear and descriptive name, so it is easy to find later. Once you save and run the connector, your resulting dataset should look something like the example below.
Conclusion
The Domo JSON No Code Connector is a fast and flexible way to bring external data into Domo without writing any code. In this post, we showed when it makes sense to use the connector and walked through a real-world example using the Cat Fact Ninja Breeds API.
For more technical details, you can view Domo’s official documentation for the JSON No Code and JSON No Code OAuth Connectors for deeper technical details.
If you need hands-on support connecting your data, explore our Domo consulting services. We’re here to help solve your data needs.

